The other weekend I tried out several new recipes.
It's good to just start knocking them off the mile-long list. I was supposed to try about 15 new ones this month, but, well, that didn't happen.
I did try a few, though.
The other weekend we tried these S'mores Fudge Pops. Mine were not nearly as pretty as the picture, but they turned out okay. These were fairly tasty, and I feel a bit better about giving these to the kids than some other store-bought freezer pop.
Next I made these SUPER DELICIOUS Homemade Snickers Bars. These are VERY GOOD. Definitely a five-star recipe. And they freeze really well. I will be making these again. Bonus: even Darren liked them!
Sunday I received some Pampered Chef items I had ordered to tried out the new recipe that went with my Deep Covered Baker: Smothered Chicken with Garlic. Darren loved this chicken. I thought it tasted pretty good. I will likely make it again, although I don't think it will be one of those "oh-my-goodness-I-have-to-have-it-now" meals. It was very moist and juicy, which is always a plus with chicken.
Well, those are my new ones! Looking forward to trying some additional new recipes within the next few weeks.
About Me

- Alaina
- I have two kids - a girl and a boy - and live in north-central Minnesota, land of snow and ice. Well, for 9 months of the year, that is. I work full-time for a local government, and on my "free time" I enjoy cooking, baking, hanging out with my kiddos, and RELAXING.
Showing posts with label baking. Show all posts
Showing posts with label baking. Show all posts
Friday, July 25, 2014

Monday, June 16, 2014
Recipe Reviews: Donuts, Chicken, and more!
Here's the awesome thing about rainy weekends: they are a perfect excuse to stay inside and do nothing.
Now, I like summer as well as the next person, but all this push to BE OUTSIDE, and ENJOY THE WEATHER, and SOAK UP THE SUN, man, that's just not me. I'm an inside kind of person. The kind who likes to sit their lazy butt on the couch and watch TV and read all day.
Children have ruined this for me.
But still, summer is so OVERWHELMING with activities. So when it rains, I'm secretly happy. Or maybe not so secretly anymore. But I don't mind a rainy weekend now and again. My regular life is busy enough; I don't feel the need to add extra activities on the weekends. Let's just all CHILL, MAN.
However, here's the thing. The thing is this: I can only do nothing for so long. Then I start to go crazy. Literally on Sunday I started wandering around my house trying to think of something to do.
I mean, something that I WANTED to do. Because Lord knows, there were a million other things I SHOULD DO.
I did A LOT of baking and cooking over the last few days. Thursday I stayed home with a diseased child, and made a giant batch of The Best Peanut Butter Chocolate Chip Cookies. These babies are delish...I think I ate about 30 over the weekend.
I am not joking.
Also on Thursday I SLAVED over homemade BBQ meatballs with Homemade BBQ Sauce from the Pioneer Woman. Confession: I only made this because I was out of the store bought stuff. I want to try it again, this time NOT substituting Tabasco for Worcestershire. I also made Herb Bubble Bread, which is out of this world, and my MIL's garlic mashed potatoes. And corn on the cob, which doesn't require to much effort other than boiling water and remembering to take butter out of the fridge.
But that wasn't it, man. Thursday was just a teaser for things to come over the weekend. I have a list a mile long of new recipes I want to try, and I am making a conscious effort this year to expand my go-to meals. Sometimes new recipes turn out to be total duds (like most of the freezer-to-crockpot meals I tried this year), sometimes they turn out so-so but aren't worth making again for one reason or another, and every once in a while I find a real winner.
Saturday morning I got up at the crack of dawn to make homemade donuts for my family. Because that's how awesome I am.
Just kidding. I actually slept in until 7:30 or so, and these took just minutes to whip together, so I can't take credit for too much. I have tried one other donut recipe in the past before, and I'd have to say I did like that one better, but these Cinnamon Baked Donuts weren't too bad, just very sweet. Darren ate half of one and said he felt his heart clogging up. Easton and I ate two each, and Natalie just licked all the cinnamon sugar off. Clearly we all have different tastes.
One thing with the donuts: do not DREDGE them in butter and then DREDGE them in the cinnamon sugar mixture. It is TOO MUCH. The butter flavor is overwhelming, and they are plenty sweet without all the extra sugar. I want to try them again, but take it a little easier on the toppings.
After I made the donuts I set about making homemade cinnamon rolls. Because, why not? I used the Buttermilk Cinnamon Rolls with Cream Cheese Glaze recipe from Mel's Kitchen Cafe, which is quickly becoming one of my favorite recipe sites. Okay, here's the thing with homemade cinnamon rolls:
(1) Pillsbury are just SKETCHY. I mean, have you ever looked at them and seriously considered how that whole process works? You beat them out of a CAN, for crying out loud! (I actually do really like these, but if I think about them too long they start to sound really weird. Like, why would I eat that?! Kind of like hot dogs.)
(2) No one in their right mind is getting up FIVE HOURS before breakfast time to make these. That's be like two in the morning! Fortunately, God invented the freezer. Here's what you can do with homemade cinnamon rolls: FREEZE THEM. You can freeze them after baking, or, my personal preference, you can freeze them right before the second rise. Then, easy peasy, take them out to thaw and rise 8-10 hours before you need them (a.k.a., the night before) and pop them in the oven in the morning. Thirty minutes to fresh homemade cinnamon rolls! Now does that knock the little dough boy out of the park or what?!
(3) I haven't actually baked them yet. This could all be wishful thinking. I will most definitely keep you posted.
Finally, the last new recipe I tried was Grilled Lime Coconut Chicken with Coconut Rice. I'm not crazy about white rice, and it wasn't anything fancy, although it complimented the chicken pretty well. But the chicken. OH, THE CHICKEN. This chicken was GOOD. The marinade was delicious! So much flavor! So much goodness! This one is DEFINITELY a keeper.
Wednesday, June 4, 2014
Recipe review: Healthy Applesauce Oat Muffins
I made these muffins on Sunday.
Three things:
(1) Don't forget the vanilla extract like I did. They came out a little bland, but still very moist and delicious. I think a little kick of vanilla would make them 100000% perfect.
(2) I substituted white flour for whole wheat because I was too lazy to dig out my whole wheat.
Side note: Does anyone else put their whole wheat flour in the freezer? I came across that tidbit somewhere along the line; it supposedly makes it last longer. Am I the only one who does this? (Read: Am I the only one who is crazy?) Please, someone, reassure me on this.
(3) If you're a little short on applesauce, you can throw in some olive oil.
Huh. I guess in hindsight I didn't really follow the recipe much at all. Just imagine how delicious they will be when you make them and actually follow instructions! Enjoy!
Tuesday, January 22, 2013
A "Very Hungry" Birthday Party
Sometimes life just gets in the way of things that I mean to do. But better late than never, right?
I always said I was not going to be the mom who went all crazy for kid's birthday parties. Haha, boy did that ever NOT work out for me.
It all started with cake class. Last spring I took Wilton cake decorating classes through JoAnn Fabrics. They were a lot of fun and I learned a little something. At least enough to do a little icing and flower making and fondant covering and sculpting. I decided I was going to make a fun cake for Natalie's birthday party.
Well, between being back and forth from the cities I decided a really fancy cake just wasn't going to work out for this year. Also, I had seen some cute ideas on Pinterest for a "Very Hungry Caterpillar" themed party.
And I went with it.

Cupcakes were way easier than making a cake, although the caterpillar's head was a small fondant-covered cake. He also had little fondant feet and fondant leaves. I found someone on Etsy to make Natalie's invitations.

We had lots of yummy food, and one thing I saw was to do the fruits that the caterpillar eats during the days of the week. Simple and easy. And delicious, especially with a cream cheese fruit dip.

Once upon a time the Eric Carle store sold Very Hungry Caterpillar plates, cups, napkins, and other party decorations. No more. I went to a local party store and found basic things with coordinating colors, and it worked out just fine.

Best part of the day? Natalie's face when she realized she got a cupcake. She loved it!
Friday, April 27, 2012
Blueberry Crumb Muffins
I couldn't even tell you for sure where this recipe came from. I don't remember.
What I do know is that these muffins are very, very delicious.
You definitely need to have fresh blueberries. These were fresh once, last summer. I love to buy blueberries in the summer when they taste better. And are cheaper. I have two full containers of frozen blueberries in my freezer, just waiting to be used in muffins, pancakes, or a pie.

You will also need flour, sugar, salt, baking powder, oil, milk, an egg, butter, and cinnamon.
Start by combining the following:
1 1/2 cups flour
3/4 cup sugar
1/2 tsp salt
2 tsp baking powder

In a one-cup measuring cup, place 1/3 cup oil. (This will make sense in a moment.)

Crack an egg in the oil. Fill the remainder of the cup with milk.

Mix the egg/milk/oil mixture into the flour mixture, mixing just until blended. Gently fold in the blueberries. Unless you like purple muffins. Then just beat the stink out of them.

Grease or line a muffin tin with paper cups.
Can I just take a moment to give a shout-out to the person who invented paper muffin cups? GENIUS.

Fill them about 2/3 full. This recipe will make 12 muffins.

And now, the moment you've been waiting for...drumroll...the CRUMB TOPPING.
It's what makes the muffin, people.
In a small bowl, mix:
1/2 cup sugar
1/3 cup flour
1/4 cup softened butter
1 1/2 tsp cinnamon
Note: I have found that halving this amount provides more than enough topping. But if you're wild and crazy and you love your crumb topping, go ahead and make the whole thing.
If you're like me, you love cinnamon so much you never measure it, and instead just generously sprinkle it into whatever recipe you're making. You also make your daughter a play on apple crisp by mixing cinnamon into her baby apples and oatmeal.
She's not a huge fan. Yet. So you finish it off yourself.
That may or may not have happened in this household.

Use a pastry blender to cut the butter into everything else, until it's nice and crumbly.
Or, if you're too lazy to open the drawer and dig out the pastry blender, a fork works just as well.

Sprinkle the cinnamon deliciousness onto the muffins.

Bake for 15-20 minutes at 400 degrees. Cool a while, then remove from pan.
Definition of "a while:" as long as you can stand smelling the blueberry-cinnamon wonder without tasting it. OR, five minutes.

Enjoy!
Monday, January 30, 2012
New Recipe: Cast iron cookie
Last year for our anniversary we went up the north shore and stayed at Bluefin Bay Resort. There are a couple restaurants there, and one of them serves cast iron chocolate chip cookies for dessert.
Darren loved it. Which is a miracle in and of itself, since the man claims to hate chocolate. Maybe it was the cast iron skillet that did it for him.
In any case, the other night we were talking about that cast iron skillet cookie, and I said I had seen a recipe for it on Pinterest. So we made it.
Darren loved it. Which is a miracle in and of itself, since the man claims to hate chocolate. Maybe it was the cast iron skillet that did it for him.
In any case, the other night we were talking about that cast iron skillet cookie, and I said I had seen a recipe for it on Pinterest. So we made it.

Pretty darn tasty.
I did get in trouble for making it "too big," so we couldn't top it with ice cream and eat it right out of the pan, like we did at the resort. I tried to insist the pans weren't that big there, but didn't get anywhere with that. Darren just kept saying the pans were that big, but the cookie was thinner.
I still think I'm right.
But anyway, here's a link to the recipe:
http://sugarcrafter.net/2011/06/10/cast-iron-skillet-chocolate-chip-cookie/
And, like all recipes, we didn't follow it exactly. We only used one kind of chocolate chips (semi-sweet), and they were mini. We also used a smaller pan and saved half the dough in the freezer, since it would have been a monster of a cookie.
Get it? Monster cookie.
Enjoy!
Friday, April 1, 2011
Verna's chocolate zucchini bread
There are no times like the hard times that bring out the true character of people. When my dad died my family was surrounded by loving support from our church. People came to spend time with us, to share in our heartache, and to bring food. They brought a lot of food. Of all the food that appeared at our house, there are two things I remember in particular. One was a delicious beef stew, and the other was this chocolate zucchini bread, brought by a woman named Verna. I'm not sure if this recipe originated with Verna or with someone else, but I will always think of this bread as Verna's Chocolate Zucchini Bread.
 Some time later, I asked Verna for the recipe. Lo and behold, it was in the church cookbook. I don't have the church cookbook (it was my mom's), but I have the recipe written out. Here's how to make this delicious bread: You will need: 3 eggs 1 cup vegetable oil (can substitute applesauce) 2 cups sugar 1 tbsp vanilla 2 cups shredded, peeled zucchini (I freeze zucchini this way so I have it just for this bread) 2 1/2 cups flour 1/2 cup baking cocoa 1 tsp salt 1 tsp baking soda 1 tsp cinnamon 1/4 tsp baking powder 1 bag chocolate chips Beat eggs, oil, sugar, and vanilla. Stir in zucchini. Combine dry ingredients and add to zucchini mixture. Mix well. Pour into 2 greased 8x4x2 loaf pans (this is a regular size loaf pan). Bake at 350 degrees for one hour or until bread tests done. Store in fridge. Note: If you substitute applesauce for oil (which I have - it cuts A LOT of calories), turn down the oven temp to 300 degrees, and bake for approximately 1 hour 15 minutes. This bread will be more moist than bread made with oil. Enjoy!
Sunday, March 27, 2011
apple crisp
I was in the mood for apple crisp this weekend. Apple crisp reminds me of fall, and I usually make it at least once during that time, but since I missed last fall I figured it was acceptable to make it in March. Right? Start with 5-7 tart apples. I used 7 because I like apples in my apple crisp. I'm weird like that.
 Just pull it off and the core is left behind. You can see the nice slices. It's like a continuous ring of apple slice, so I use a knife and quarter it (top to bottom) so the pieces are the right size. I also don't worry about the little bit of skin left on. Life's too short to be worrying about things like that.
 Here's what it looks like after I quarter it.
 Darren took this picture of me while I was doing the apples.
 Put the apple slices in a bowl and add 3/4 cup sugar...
 ...a dash of salt...
 ...one teaspoon cinnamon, and 1/4 teaspoon nutmeg. I was generous on both because I like it pretty flavorful.
 Mix it up until the apples are nicely coated. Eat a few. Consider eating them all. Talk yourself out of it by reminding yourself how good it will taste baked.
 Spread the apples in a 9x13 pan.
 For the topping, mix 1 cup flour...
 ...1 cup lightly packed brown sugar...
 ...1/2 cup oatmeal...
 ...and one stick butter. Yes, I realize my bowl is dirty; it's the same one I mixed the apples in. Who wants more dirty dishes than necessary?
 I love the Pampered Chef pastry...pastry...thing...to cut in butter. I can't remember what it's called; someone help me...
 Sprinkle the topping over the apples and bake for about 30 minutes at 400 degrees.
 Remove from oven when the top is nicely browned. Top with ice cream or cool whip. Think of fall and enjoy!


I have the Pampered Chef apple peeler/corer/slicer, which is absolutely amazing for making any apple dish. Works like a charm. I've never mastered the art of peeling apples (or peeling potatoes for that matter) and I don't plan to start now.
 This is what the apple looks like after I crank it through the peeler/corer/slicer.
 Just pull it off and the core is left behind. You can see the nice slices. It's like a continuous ring of apple slice, so I use a knife and quarter it (top to bottom) so the pieces are the right size. I also don't worry about the little bit of skin left on. Life's too short to be worrying about things like that.
 Here's what it looks like after I quarter it.
 Darren took this picture of me while I was doing the apples.
 Put the apple slices in a bowl and add 3/4 cup sugar...
 ...a dash of salt...
 ...one teaspoon cinnamon, and 1/4 teaspoon nutmeg. I was generous on both because I like it pretty flavorful.
 Mix it up until the apples are nicely coated. Eat a few. Consider eating them all. Talk yourself out of it by reminding yourself how good it will taste baked.
 Spread the apples in a 9x13 pan.
 For the topping, mix 1 cup flour...
 ...1 cup lightly packed brown sugar...
 ...1/2 cup oatmeal...
 ...and one stick butter. Yes, I realize my bowl is dirty; it's the same one I mixed the apples in. Who wants more dirty dishes than necessary?
 I love the Pampered Chef pastry...pastry...thing...to cut in butter. I can't remember what it's called; someone help me...
 Sprinkle the topping over the apples and bake for about 30 minutes at 400 degrees.
 Remove from oven when the top is nicely browned. Top with ice cream or cool whip. Think of fall and enjoy!

Sunday, November 21, 2010
mini lava cakes
I got this recipe from my favorite blog, The Pioneer Woman. These mini lava cakes are super easy, so delicious, and fairly impressive. Unless your guests see you making them and realize how easy they actually are.
 I halved the recipe since it was just me last night, so I have one mini lava cake in the fridge. I'm curious to see how it turns out. What I'm telling you is the half recipe, for two people. Or one person.
 Start with two custard cups. Spray them generously with Pam. Seriously cannot be generous enough with the Pam here, people. We want these babies to just fall right out when they're done baking. You can get custard cups at Target. Mine are Anchor brand, but I'm sure Pyrex makes them too. And they come with lids. How handy! Preheat your oven to 425 degrees.
 You'll need 2 oz semi-sweet baking chocolate and half a stick of butter. Yes, that means each mini lava cake has one-quarter of a stick of butter. Did I mention how yummy they are?? Note: That chocolate bar is 4 oz, so I broke it in half. You can also buy 1-oz baking chocolate squares. I do have some...not sure why I didn't use those instead.
 Microwave the chocolate and butter on high for about one minute, until butter is melted. Whisk until chocolate is also melted and the whole thing is just a smooth chocolate-buttery cream.

Stir in 1/2 cup powdered sugar until well blended.
 Put in one egg...
 ...and one egg white. Note: When I was re-typing the recipe at the bottom I realized I should have put in one egg YOLK, not white. So pretend I did. But on a side note, it turned out okay, so if you want to cut some of the cholesterol and fat, give it a go. Notice my awesome Pampered Chef egg separator. Probably the most practical of all PC inventions. I love it. See how the white just oozes through and the yolk is left? Makes separating eggs so easy. I seriously don't even know how to do it any other way. My MIL has this fancy trick where she just pours the yolk back and forth in the egg shells until somehow it's magically separated. I think I should maybe try it someday, but I don't have any high hopes for success.
 Whisk in the egg and the white. Add 3 tbs flour. Stir. Divide the batter between the two custard cups on a baking sheet.
 I also love this little baking sheet. I got it from (where else?) Pampered Chef. Perfect for baking chicken nuggets or french fries or tator tots. Or mini lava cakes.
 Bake 13-14 minutes until sides are firm and center is soft. This is VERY IMPORTANT: you do not want to under bake. Or over bake. If you under bake, the cakes will fall apart and your molten chocolate will go everywhere (I speak from experience). If you over bake, well, you won't have any molten chocolate. The hardest part about this recipe is flipping the cakes out without breaking them. Here's what works for me: Hold the bottom of the custard cup in your palm (with an oven mitt, of course!) and a plate in the other hand. Set the plate face down on top of the custard cup. In one motion, flip the entire thing so the custard cup is now inverted on top of the plate. If you used enough Pam, the cake should just slide right out. Try not to let the custard cup actually touch the plate, because it's very difficult to get it off. Or maybe that's just me. But I've had issues. If it does get stuck to the plate, trapping your lovely lava cake, use a sharp knife to pry up the edges and try and grab it. Maybe I just need better oven mitts with grippers or something, because this part is super difficult for me...
 You will definitely want to serve this with either ice cream or homemade whipped cream, because it's so rich and chocolaty it needs something to balance it out.
 Put in one egg...
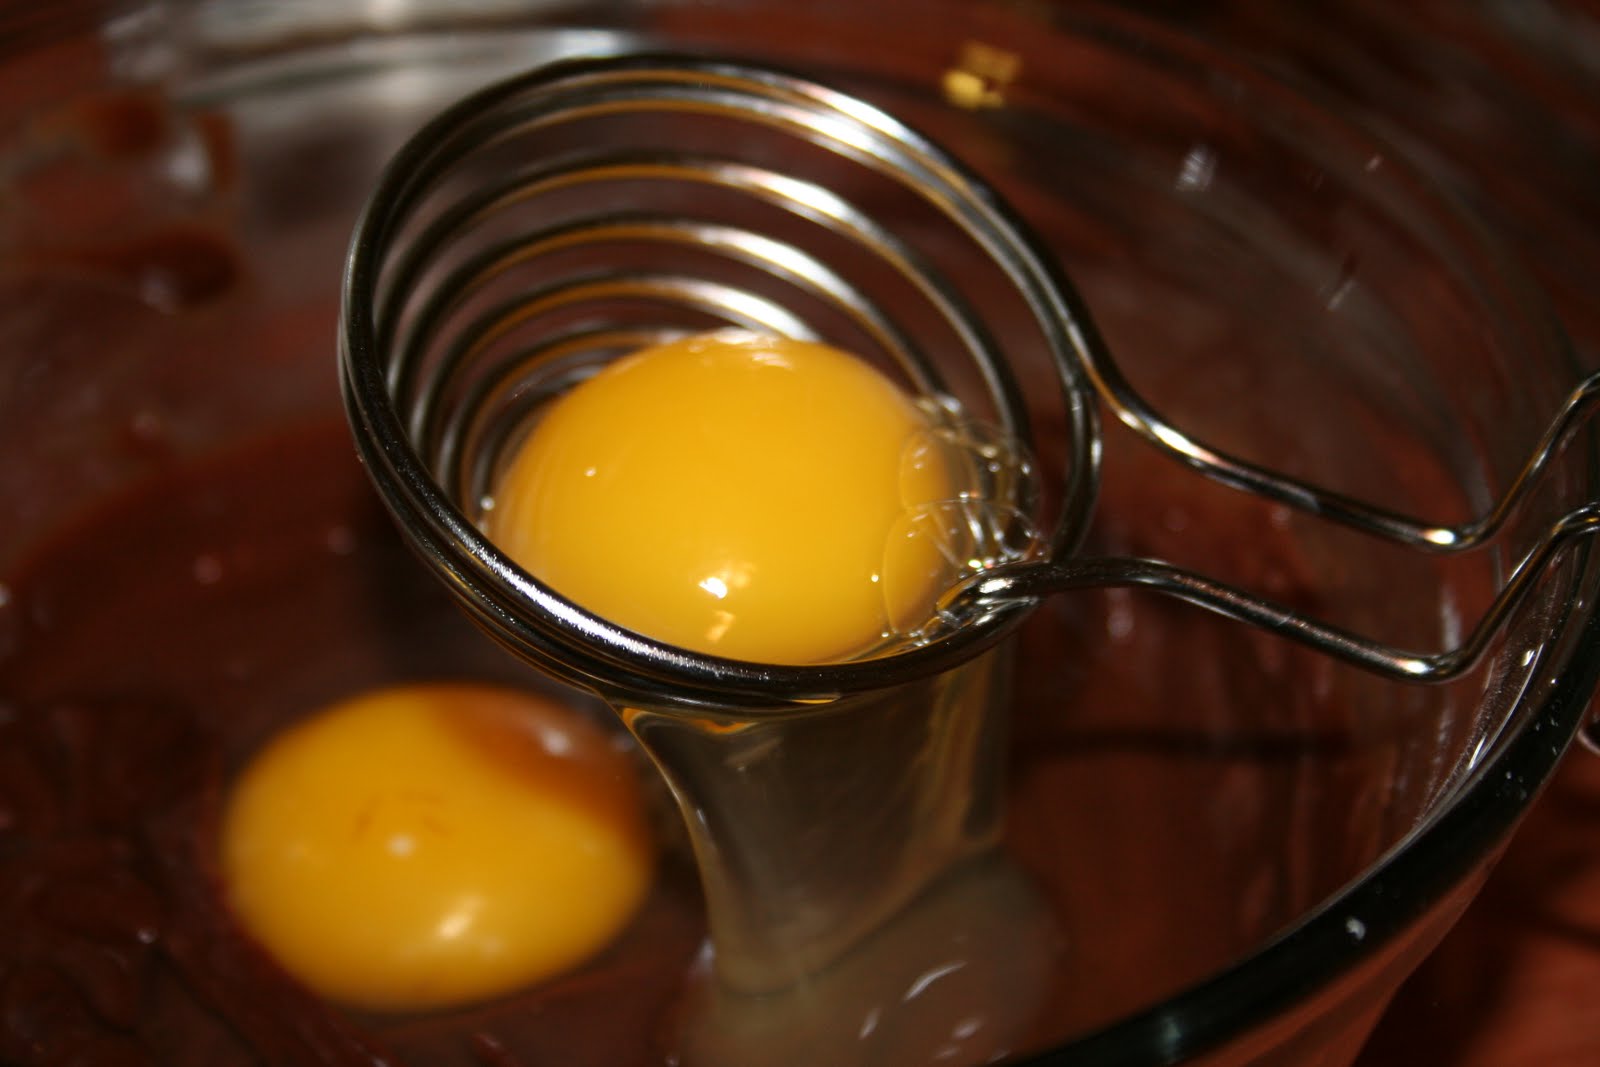 ...and one egg white. Note: When I was re-typing the recipe at the bottom I realized I should have put in one egg YOLK, not white. So pretend I did. But on a side note, it turned out okay, so if you want to cut some of the cholesterol and fat, give it a go. Notice my awesome Pampered Chef egg separator. Probably the most practical of all PC inventions. I love it. See how the white just oozes through and the yolk is left? Makes separating eggs so easy. I seriously don't even know how to do it any other way. My MIL has this fancy trick where she just pours the yolk back and forth in the egg shells until somehow it's magically separated. I think I should maybe try it someday, but I don't have any high hopes for success.
 Whisk in the egg and the white. Add 3 tbs flour. Stir. Divide the batter between the two custard cups on a baking sheet.
 I also love this little baking sheet. I got it from (where else?) Pampered Chef. Perfect for baking chicken nuggets or french fries or tator tots. Or mini lava cakes.
 Bake 13-14 minutes until sides are firm and center is soft. This is VERY IMPORTANT: you do not want to under bake. Or over bake. If you under bake, the cakes will fall apart and your molten chocolate will go everywhere (I speak from experience). If you over bake, well, you won't have any molten chocolate. The hardest part about this recipe is flipping the cakes out without breaking them. Here's what works for me: Hold the bottom of the custard cup in your palm (with an oven mitt, of course!) and a plate in the other hand. Set the plate face down on top of the custard cup. In one motion, flip the entire thing so the custard cup is now inverted on top of the plate. If you used enough Pam, the cake should just slide right out. Try not to let the custard cup actually touch the plate, because it's very difficult to get it off. Or maybe that's just me. But I've had issues. If it does get stuck to the plate, trapping your lovely lava cake, use a sharp knife to pry up the edges and try and grab it. Maybe I just need better oven mitts with grippers or something, because this part is super difficult for me...
 You will definitely want to serve this with either ice cream or homemade whipped cream, because it's so rich and chocolaty it needs something to balance it out.
Mmmm...now that's what I'm talking about. Here's the recipe written out: 2 oz semi-sweet baking chocolate 1/4 cups butter (half a stick) 1/2 cup powdered sugar 1 whole egg 1 egg YOLK 3 tbs flour Preheat oven to 425 Spray 2 custard cups with Pam and place on cookie sheet. Microwave chocolate and butter in large bowl on high for about 1 minute, until butter is melted. Whisk until chocolate is also melted. Stir in sugar until well blended. Whisk in eggs and yolks. Stir in flour. Divide between cups. Bake 13-14 minutes until sides are firm and center is soft. Let stand 1 minute. Invert onto plate. Serve with cream or ice cream.
Friday, March 12, 2010
Eunice's Cookies: An Alternative
Remember when I told you about Eunice's Cookies? My goodness, I love those cookies. I also love these. 

A variation of Eunice's original cookies. These are made with the exact same recipe, only instead of chocolate chips and yellow cake mix, it's vanilla-flavored frosting and confetti cake. They taste like bite-sized pieces of cake wonderfulness. Also, does anyone know where I could get a cute plate like that?
Tuesday, March 9, 2010
Focaccia Bread
I don't even remember where I found the recipe for this bread. It might have been Taste of Home online, but I can't be sure. What I am sure about is that this bread is delicious. With a hard crust, garlic flavor, and a soft inside you'll think you've died and gone to heaven.

Now, you can make this bread by hand--like I have in the past when my bread machine pooped out on me--or you can do it the easy way and have the bread machine do all the hard work for you. That's the way I usually choose.
Here's what you'll need: 1 cup plus 3 tbs water (70-80 degrees; it's cooler than you think) 1 tbs olive oil, plus additional olive oil 1 tsp salt 3 cups bread flour 1 1/2 tsp active dry yeast 1 tbs grated Parmesan 1 1/2 tsp minced rosemary 1 tsp garlic salt cracked pepper to taste
Place water, 1 tbs olive oil, salt, bread flour, and yeast in bread machine in order listed. Select dough setting. Let the machine do the work. When finished, wait five minutes before removing the dough. By hand: Mix the same ingredients and knead 8 minutes. Form into ball and cover. Set in warm place. Let rise 40 minutes; punch down and reshape. Let rise another 30-40 minutes in warm place. Once the dough is ready transfer it to a greased baking sheet. Pat it into an 8" circle about 3/4" high. Brush with additional olive oil and sprinkle with cheese, garlic salt, and rosemary. (You can use fresh rosemary, but I use dried rosemary leaves that I grind up in my mortar and pestle.) Bake at 425 degrees for 20-25 minutes or until golden brown. I love it dipped in some olive oil mixed with a dash of cracker pepper. Mmmm...so good!
Friday, December 11, 2009
Eunice's Cookies

Since I was sharing about my use for cake mixes yesterday I thought I'd give you the recipe for these cookies. When I was in high school I'd make them every once in a while for my classmates. Everyone liked them. I love them. My family calls them Eunice's cookies because that's the name of the woman we got the recipe from. You can call them Alaina's cookies. Or I suppose you could just call them cake mix cookies. But where's the fun in that? I always name recipes after people. For example: Brenda's World Famous Banana Bread
Jen's Amazing Cookies
Sue's Strawberry Pie
Candy's Punch PW's Strawberry Shortcake Cake
Shelly's Salsa
Tina's Cheesy Sausage Dip
And, of course, Eunice's Cookies I seriously have them written down in my cookbook this way. I'm not sure why I do that. Maybe it helps me remember exactly which banana bread I'm referring to, since I also have a recipe for Healthified Banana Bread in there. Who knows how my mind works. If any of these recipes sound intriguing and you would like them, let me know. In any case, here is the recipe for Eunice's cookies: 1 box yellow cake mix
1/2 cup Crisco
2 eggs
1 cup chocolate chips Mix all but chocolate chips. Add last. Bake at 350 degrees for 12 minutes. How easy was that? I usually double the recipe for a family, because it's not that big. And, with the $0.78 cake mix I got the other day and my free chocolate chips last week, this recipe is a money-saver!

This isn't what your cookies will look like. They will actually be yellower. Like yellow cake. I took this picture from the internet just to liven things up around here. The best part about these cookies is that they stay fresh for a really long time. It's probably the cake mix, since it isn't the Crisco, eggs, or chocolate chips. Enjoy!
Subscribe to:
Posts (Atom)